前言:估计很多人可能会好奇,我以前不是一直喜欢使用Apache的么,怎么突然间开始喜欢上了Nginx了呢?啊哈哈哈哈,其实我是被Nginx的反向代理和均衡负载所吸引了,后面我写walle半自动化部署平台的安装时,也许你们就能明白Nginx的优点了,这里就不多说了,有兴趣的同学可以去百度搜索一下Nginx和Apache的一些优缺点。为了写这一篇文章,我可是重新搭建了一台虚拟机了,截图为证,刚搭完的,还是新鲜的,来来来,赶紧趁热。

这里我安装的是Ubuntu19.04,最新版的Ubuntu桌面系统了,优化了整体的UI,如果配置足够装成双系统,可能可以如丝般顺滑呢。
一、配置apt源为阿里云的源
配置源是为了快速的下载嘛,这几年阿里为我们开发者做了不少贡献,有能力的可以去开台服务器啦,学生机一个月才10块钱,不少学生机一个月大概30来块吧,话不多说,进入正题。
1、安装vim编辑器
|
1 |
sudo apt install -y vim |
2、备份apt源的配置文件:
|
1 |
sudo cp /etc/apt/sources.list /etc/apt/sources.list.bak |
作为一个好的开发者一定要学会备份。
3、打开apt源的配置文件
|
1 |
sudo vim /etc/apt/sources.list |
4、清空sources.list文件内的所有内容,vim命令模式下输入下面命令
|
1 |
:%d |
5、把下面的阿里云源复制到sources.list文件内
|
1 2 3 4 5 6 7 8 9 10 11 12 13 14 15 16 17 18 19 20 21 22 23 24 25 26 27 28 29 30 31 32 33 34 35 36 37 38 39 40 41 42 43 44 45 46 47 48 49 50 51 52 53 54 55 56 57 58 59 |
## Note, this file is written by cloud-init on first boot of an instance ## modifications made here will not survive a re-bundle. ## if you wish to make changes you can: ## a.) add 'apt_preserve_sources_list: true' to /etc/cloud/cloud.cfg ## or do the same in user-data ## b.) add sources in /etc/apt/sources.list.d ## c.) make changes to template file /etc/cloud/templates/sources.list.tmpl # See http://help.ubuntu.com/community/UpgradeNotes for how to upgrade to # newer versions of the distribution. deb http://mirrors.aliyun.com/ubuntu/ bionic main deb-src http://mirrors.aliyun.com/ubuntu/ bionic main ## Major bug fix updates produced after the final release of the ## distribution. deb http://mirrors.aliyun.com/ubuntu/ bionic-updates main deb-src http://mirrors.aliyun.com/ubuntu/ bionic-updates main ## N.B. software from this repository is ENTIRELY UNSUPPORTED by the Ubuntu ## team. Also, please note that software in universe WILL NOT receive any ## review or updates from the Ubuntu security team. deb http://mirrors.aliyun.com/ubuntu/ bionic universe deb-src http://mirrors.aliyun.com/ubuntu/ bionic universe deb http://mirrors.aliyun.com/ubuntu/ bionic-updates universe deb-src http://mirrors.aliyun.com/ubuntu/ bionic-updates universe ## N.B. software from this repository is ENTIRELY UNSUPPORTED by the Ubuntu ## team, and may not be under a free licence. Please satisfy yourself as to ## your rights to use the software. Also, please note that software in ## multiverse WILL NOT receive any review or updates from the Ubuntu ## security team. # deb http://mirrors.aliyun.com/ubuntu/ bionic multiverse # deb-src http://mirrors.aliyun.com/ubuntu/ bionic multiverse # deb http://mirrors.aliyun.com/ubuntu/ bionic-updates multiverse # deb-src http://mirrors.aliyun.com/ubuntu/ bionic-updates multiverse ## Uncomment the following two lines to add software from the 'backports' ## repository. ## N.B. software from this repository may not have been tested as ## extensively as that contained in the main release, although it includes ## newer versions of some applications which may provide useful features. ## Also, please note that software in backports WILL NOT receive any review ## or updates from the Ubuntu security team. # deb http://mirrors.aliyun.com/ubuntu/ bionic-backports main restricted universe multiverse # deb-src http://mirrors.aliyun.com/ubuntu/ bionic-backports main restricted universe multiverse ## Uncomment the following two lines to add software from Canonical's ## 'partner' repository. ## This software is not part of Ubuntu, but is offered by Canonical and the ## respective vendors as a service to Ubuntu users. # deb http://archive.canonical.com/ubuntu bionic partner # deb-src http://archive.canonical.com/ubuntu bionic partner deb http://mirrors.aliyun.com/ubuntu bionic-security main deb-src http://mirrors.aliyun.com/ubuntu bionic-security main deb http://mirrors.aliyun.com/ubuntu bionic-security universe deb-src http://mirrors.aliyun.com/ubuntu bionic-security universe # deb http://mirrors.aliyun.com/ubuntu bionic-security multiverse # deb-src http://mirrors.aliyun.com/ubuntu bionic-security multiverse |
6、保存并退出,vim命令行模式下输入以下命令
|
1 |
:wq |
7、更新apt源
|
1 |
sudo apt update |
二、安装Nginx服务器
|
1 |
sudo apt install -y nginx |
等待安装完毕后,我们打开浏览器输入127.0.0.1测试看看,出现以下画面就说明安装成功了

三、安装php7.3
本来想讲安装7.2的,这样可能会方便一些,不过想了一下,php7.4都快要出来了,况且我自己也用着php7.3也没啥问题,直接讲最新的吧。但是Ubuntu的阿里云源还没更新到PHP7.3,这里我们就要手动添加ppa源了,不知道ppa源是什么的可以去百度一下吧,这里就不做多余的解释了。
1、安装software-properties程序,为了方便我们使用ppa源下载
|
1 |
sudo apt-get install software-properties-common |
2、添加PHP的ppa源
|
1 |
sudo add-apt-repository ppa:ondrej/php |
3、更新apt源
|
1 |
sudo apt-get update |
4、安装php7.3
|
1 |
sudo apt-get install -y php7.3 php7.3-fpm |
这里不仅限于安装php7.3了,想安装PHP7.2的可以把7.3换成7.2,看你们想要什么版本就安装什么版本,这里我以最新的去讲。
安装快要结束了,apt给我们报了个错误,如下图:

看到错误了,先不要慌,看看报错上写的是什么,错误上说Apache未能启动或启动失败,我一想,会不会是Ubuntu19.04上预装了Apache,来检查一下就知道了,输入如下命令:
|
1 |
apache2 -v |

果然,Apache不愧是老大哥啊,咋哪都有他,不过没事,看图中PHP7.3是安装上的了,你们也可以自己检查一下,命令为:
|
1 |
php -v |
既然PHP没问题,那么我们把Apache给干掉把,我这人强迫症,留着碍眼,万一哪天Nginx报错了就有可能是Apache搞的鬼,输入以下命令卸载掉Apache和其的相关依赖:
|
1 |
sudo apt autoremove -y apache2 |
到这里PHP就安装完了,需要安装一些别的扩展的,可以去根据自己的PHP版本去apt源里搜索对应的扩展进行安装
四、安装MySQL5.7
1、这里我们安装mysql-server和mysql-client就可以了,默认会给我们装上最新的MySQL5.7了,如果不是默认的再卸载,指定版本就行了
|
1 |
sudo apt install -y mysql-server mysql-client |
2、修改MySQL的配置文件让我们可以无密码登录,以为目前MySQL默认生成的密码我们还不知道,MySQL配置文件在/etc/mysql/mysql.conf.d/mysqld.cnf下,我们打开他在里面加上一行代码,让其可以无密码登录
|
1 |
vim /etc/mysql/mysql.conf.d/mysqld.cnf |
在/etc/mysql/mysql.conf.d/mysqld.cnf文件下的mysqld区块内,添加如下代码
|
1 |
skip-grant-tables |
如图:

然后重启我们的MySQL服务
|
1 |
service mysql restart |
3、修改MySQL的密码,首先登录mysql的命令行,命令如下
|
1 |
mysql -u root -p |
这里直接按回车就行了,因为我们刚刚设置了无密码登录的
进入到命令行后,我们输入如下命令:
//使用mysql表
|
1 |
use mysql; |
//更改mysql5.7下root用户的密码为root
|
1 |
update user set authentication_string=PASSWORD("root")where user='root'; |
//更新mysql密码表
|
1 |
update user set plugin="mysql_native_password"; |
//刷新权限
|
1 |
flush privileges; |
//退出mysql命令行
|
1 |
exit; |
然后别忘了去把我们的无密码登录那一行代码删除掉,修改过后如图:

这里我刚好看到一段代码:bind-address = 127.0.0.1,我建议这里把这行代码注释掉,因为这个是绑定了访问MySQL的地址,如果想要开启远程登录访问的话就把这句话注释掉,当然如果你习惯在Ubuntu里面操作MySQL我也没啥意见。
然后重启mysql服务
|
1 |
service mysql restart |
接下来我们再次登录MySQL,先不输入密码,直接按回车出现下图:

这说明mysql不能无密码登录了,接下来看看输入正确密码能不能进去了,如图:

这就进入当MySQL的命令行界面了,我们可以看到我们的版本为:MySQL5.7.27
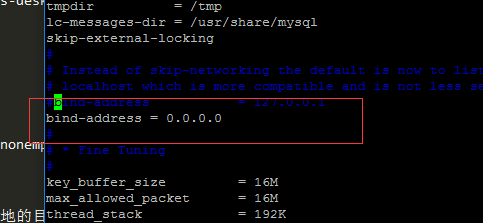
但是外界还是无法访问MYSQL的ip地址的~本地用Navicat之类的软件连接会报1030错误
解决方案:
修改mysql配置文件
进入:/etc/mysql/mysql.conf.d文件将bind-address改为0.0.0.0(允许任何人)
然后进入mysql终端
执行以下命令:
GRANT ALL PRIVILEGES ON . TO 'root'@'%' IDENTIFIED BY '您的数据库密码' WITH GRANT OPTION;
刷新权限:
命令: flush privileges;
到这里MySQL也安装完毕了,本想结束本次教程的,但是为了方便下一篇文章写walle半自动化部署平台的安装,我还是给大家推荐安装一些常用的软件吧。怎么用我就不讲了,先安装着吧!
五、安装Git分布式版本控制器
|
1 |
sudo apt install -y git |
六、安装composer扩展包管理工具
|
1 |
sudo apt install -y composer |
七、到这也接近尾声了,来我们测试一下吧,还是老办法,用php探针网页访问一下看能不能访问到,并且查看本机PHP的信息了
1、首先不用想我都知道肯定是不行的了,因为Nginx还没有配置php的位置呢,他怎么知道php交给谁处理。
2、打开Nginx的配置文件,默认是在/etc/nginx下的,如图

Nginx默认的虚拟主机目录在/etc/nginx/sites-available下,所以我们进入这个目录,如图有个default文件

打开这个default文件
|
1 |
sudo vim default |
如图这一块地方是Nginx处理PHP文件的地方,我们要将这个东西指向我们本地的php运行端口,或者直接指向.sock文件,如图:

我们将图中红框圈住的内容解除注释,并修改为如下代码:
|
1 2 3 4 5 6 7 |
location ~ \.php$ { include snippets/fastcgi-php.conf; fastcgi_pass unix:/var/run/php/php7.3-fpm.sock; fastcgi_split_path_info ^(.+\.php)(/.+)$; fastcgi_param SCRIPT_FILENAME $document_root$fastcgi_script_name; include fastcgi_params; } |
如图所示:

顺便我们翻上去看看网址的根目录在哪,如图:

然后这里再顺路把server_name改了,改为localhost,如图:

保存退出后,重启一下Nginx服务
|
1 |
service nginx restart |
然后再重启一下php-fpm服务
|
1 |
service php7.3-fpm restart |
然后在我们刚刚看到的网址根目录下创建一个index.php文件
|
1 |
sudo vim /var/www/html/index.php |
在文件里面写如下内容:
|
1 2 3 |
<?php phpinfo(); ?> |
然后打开网页访问:localhost/index.php
如果和下图一样,则说明环境搭建成功了。

结语:到这里搭建过程就结束了,这一下子码了两千字年轻人也顶不住了,休息一下,walle的文章明天再写,还有你们可能会觉得Nginx比较麻烦把,过几天再写一篇Nginx配置虚拟主机的一些优化文章出来吧,感谢大家的阅读点个赞再走吧!
兰陵美酒郁金香
大道至简 Simplicity is the ultimate form of sophistication.
文章评论(0)